Nuvei Mobile SDK

By using Nuvei SDK for mobile, you can quickly integrate more payment options directly in your mobile application. Our SDK provides one unique interface to Cards, Alipay and WeChat in-app payments.

You can download our mobile SDK for Android and iOS together with demo projects from Github:

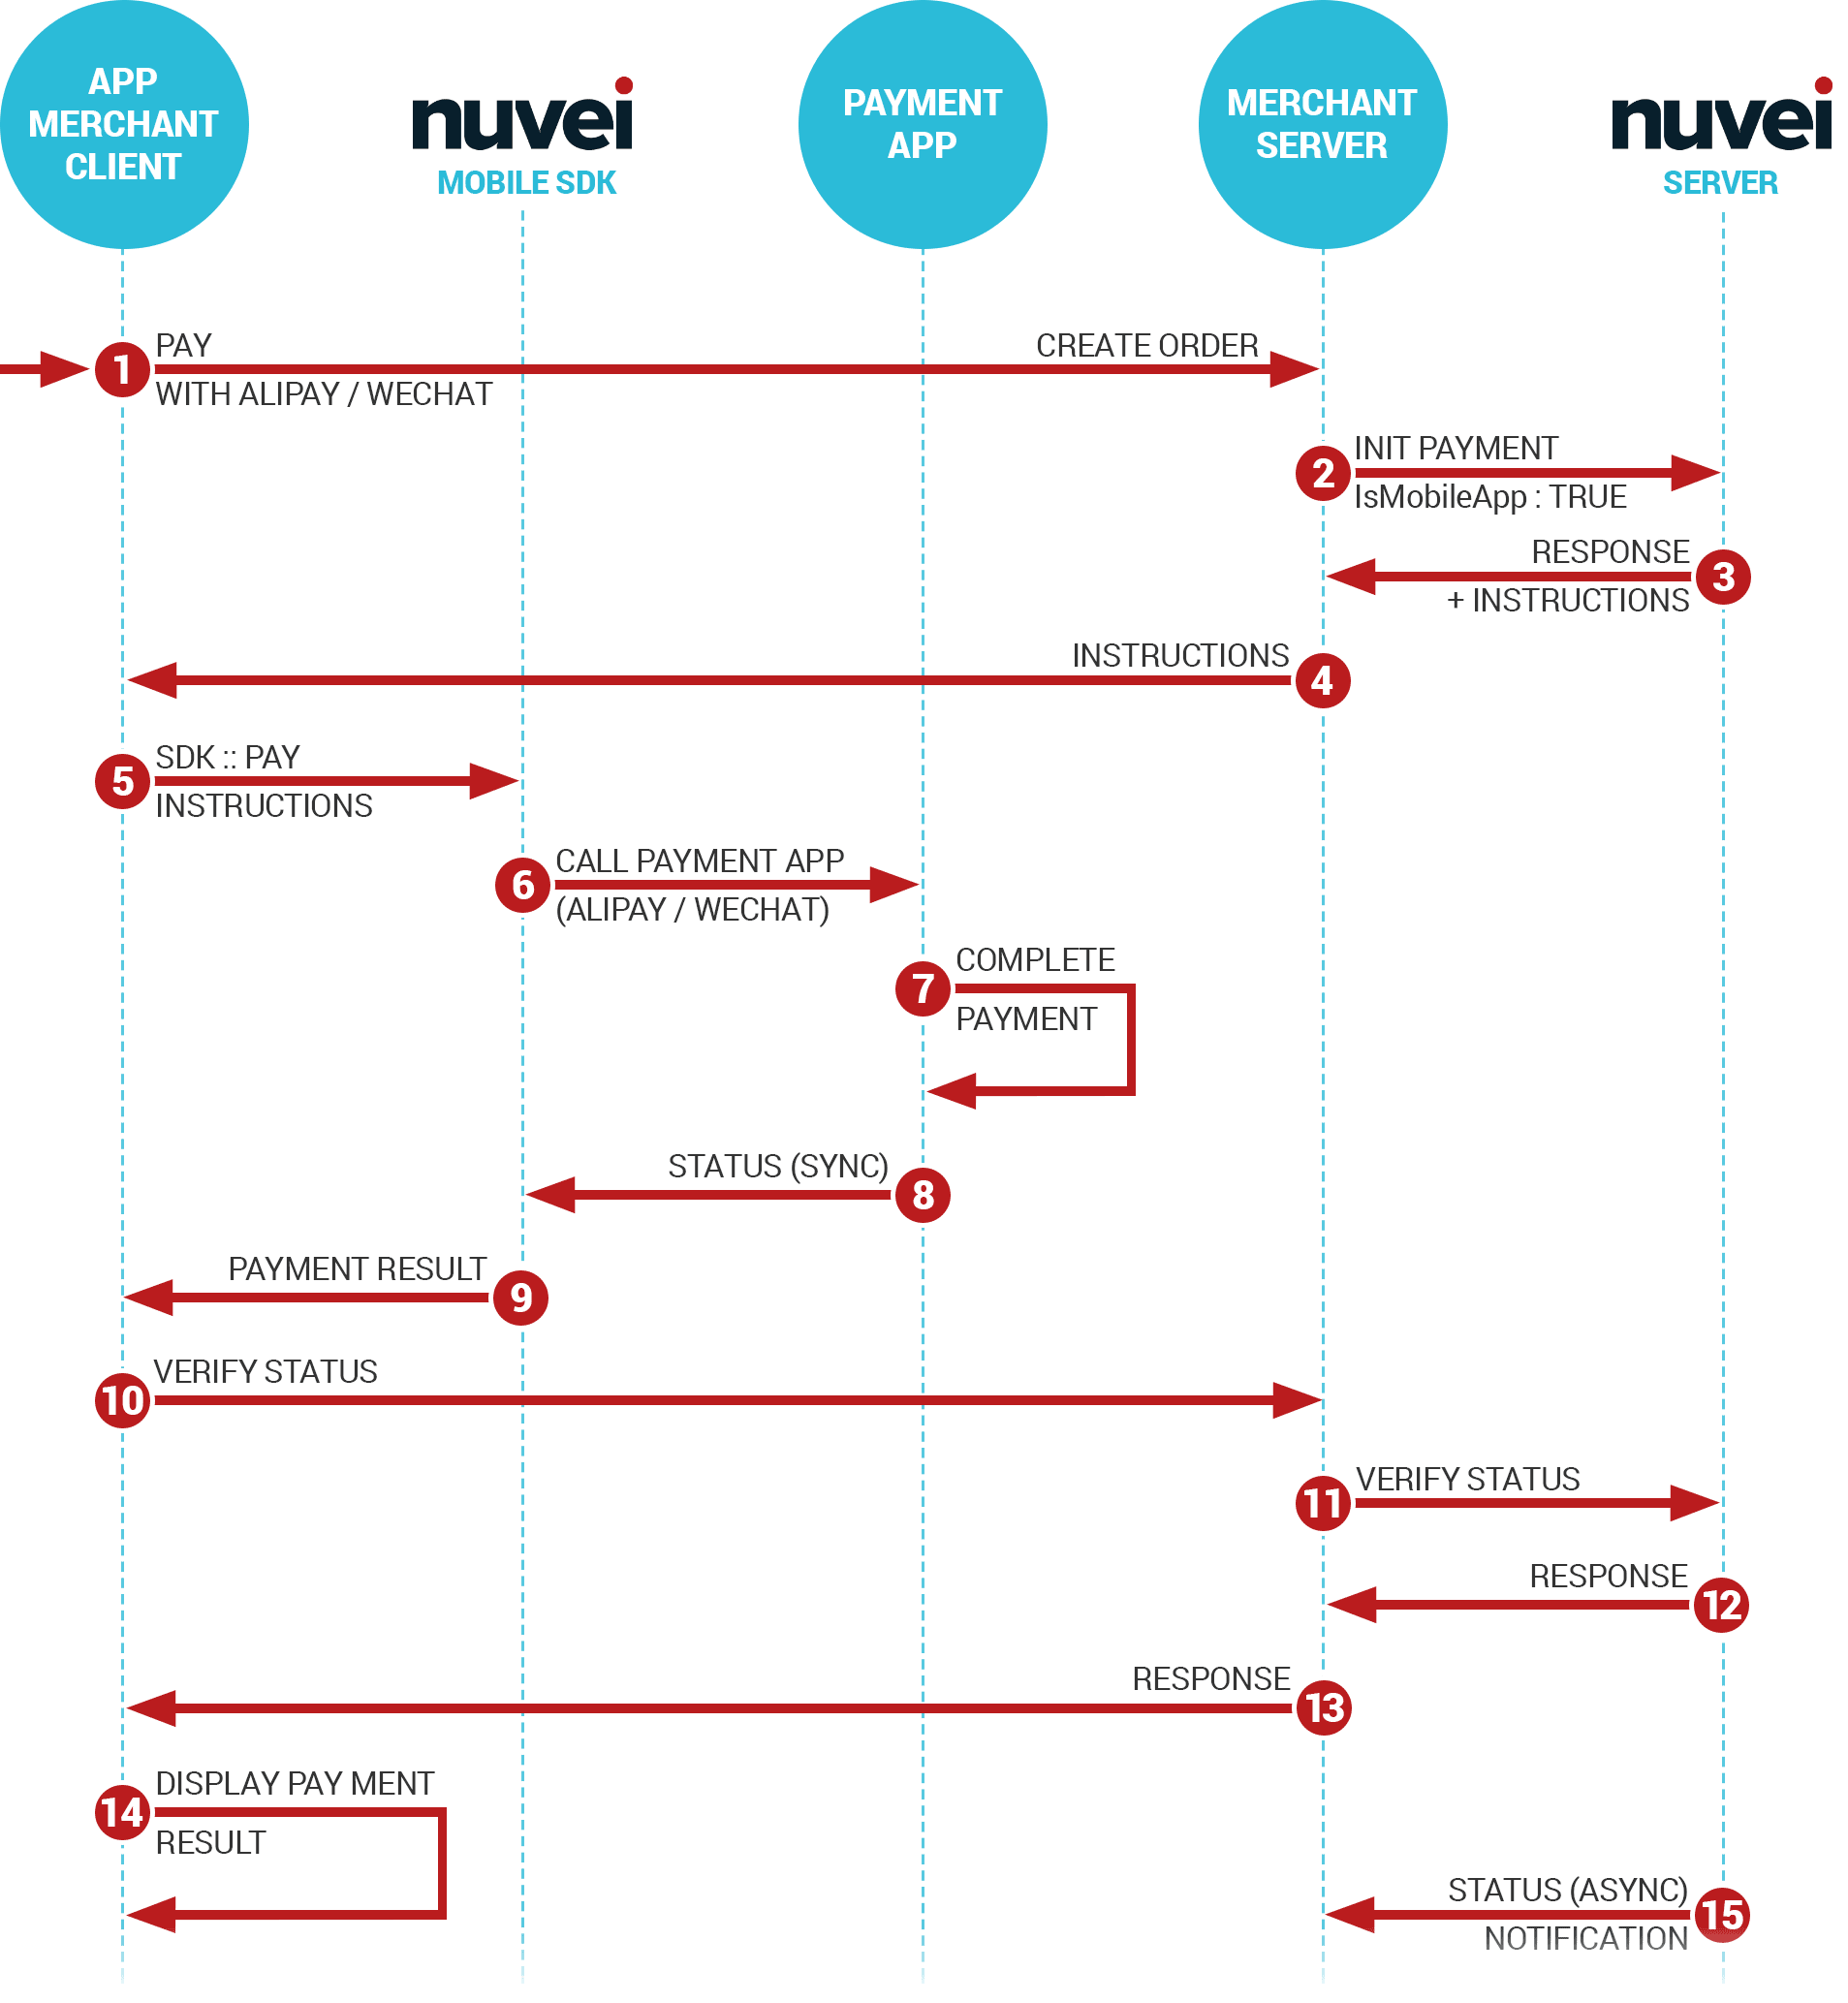
For Alipay and Wechat, the payments are initiated by the user from the mobile app and the initial message is sent by your server to our REST API in the usual way (see Create a payment), plus sending an additional parameter IsMobileApp: true. We will respond back with the Instructions field that needs to be passed from your app to our SDK. Our SDK handles the various calls to Alipay or WeChat apps and returns the control to your app for the final verification of the status.

Besides Alipay and WeChat, our Mobile SDK can be used for in-app purchases using Credit Cards. The advantage of using our SDK is that the credit card details never reach your server, simplifying to a minimum the PCI requirements you must meet.

For more details regarding the installation and the configuration of the SDK, please go to the below sections:

Nuvei Android SDK Installation

You need to follow the below steps to build an in-app payment flow using Smart2Pay.SDK.Payment, a class designed to make building your app’s checkout flow as easy as possible.

  1. Download the smart2pay.aar file located at: https://github.com/Smart2Pay/SDK-Android-Release/tree/master/releases.
  2. Place the .aar file in the app/libs folder.
  3. Add this to your app Gradle file and click on the Sync Now button.
    dependencies {
        api files('libs/smart2pay.aar')
    }

Now that the SDK is in the app, you can actually use it in the code. Continue with setting up the SDK:

Nuvei Android SDK Instructions for Alipay and Wechat (Java)

Now that you have imported the Smart2Pay.SDK package into your app, you need to follow the below steps in order to set up the Mobile SDK for Android in Java language.

If you are using Kotlin go to our section: Nuvei Mobile SDK Configuration using Kotlin language.

  1. [APP] Create an order to your server

    //sample code, put your own logic of creating an order to your server
    order order = new Order()
    order.setAmount(1);
    order.setCurrency("CNY");
    order.setType(Payment.PaymentProvider.ALIPAY); //or Payment.PaymentProvider.WECHAT
    order.create();
    
  2. [SERVER] Once the order is created on your server, from the server create a Payment using our REST API and specifying isMobileApp: true.

    {
      "Payment": {
        "MerchantTransactionID": "{{tester}}-{{env}}-{{time}}-{{rand}}",
        "Amount": "100",
        "Currency": "CNY",
        "ReturnURL": "https://www.merchant.com/return",
        "MethodID" : "24",
        "Customer":{
          "Email": "john.doe@isp.com"
        },
        "Details":{
          "IsMobileApp": true
        }
      }
    }
    
  3. [SERVER] Our server responds with Instructions field which you need to pass to the app.

    {
      "Payment": {
        "ID": 4164863,
        "MethodID": 24,
        […]
        },
        "ReferenceDetails": {
    […]
          "Instructions": "_input_charset=\"utf-8\"&appenv=\"system=android^version=3.0.1.2\"&body=\"Alipay Payment\"&currency=\"USD\"&forex_biz=\"FP\"&notify_url=\"https://europaytest.smart2pay.com/Alipay/Landing/AlipayNotificationURL.aspx\"&out_trade_no=\"s2ptest200336\"&partner=\"2088201612260077\"&payment_type=\"1\"&rmb_fee=\"1\"&secondary_merchant_id=\"GP1045\"&secondary_merchant_industry=\"5946\"&secondary_merchant_name=\"demo iasi test\"&seller_id=\"2088201612260077\"&service=\"mobile.securitypay.pay\"&subject=\"Alipay Payment\"&supplier=\"demo iasi test\"&sign=\"vRQ1ouMvn0rJUCxSEi91RLJcS0NU7mojYfJpfT8gxtctF8jfJ4x6uN8t0ETdDdmGziqP7IsYHTSAHdFLHGO4hQdovyzJMna42nc9DcfMMlhTX7ZVCa7rUuieBWcW0ek8w3DxojrWnWT9lM3lUQZVLsY1CjXFGJ126x4TnjrA86w%3d\"&sign_type=\"RSA\""
        },
        "Status": {
          "ID": 1,
          "Info": "Open",
          "Reasons": null
          },
       […]
      }
    }
    
  4. [APP] Get the instructions from the server response.

    String instructions = order.getInstructions();
  5. [APP] Call Nuvei Mobile SDK by creating a Payment object, passing the Activity, payment type and instructions. Then trigger the payment using a PaymentManager object.

    Payment payment = new Payment();
        payment.setInstructions(instructions);
        payment.setType(Payment.PaymentProvider.ALIPAY);
        payment.setActivity(this);
    
        PaymentManager paymentManager = new PaymentManager();
        paymentManager.pay(payment);

    The information needed inside the Payment object of our mobile SDK:

    class Payment {
        enum PaymentProvider {
            NONE,
            ALIPAY,
            WECHAT
        };
        int ID;
        PaymentProvider type;
        String instructions;
        Activity activity;
    }

    When pasting this into your code the imports should go automatically or you can add them manually:

    import com.smart2pay.sdk.PaymentManager;
    import com.smart2pay.sdk.models.Payment;
  6. [SDK] Our SDK triggers Alipay or WeChat application

  7. [User] The user completes the payment

  8. [SDK] Alipay or WeChat application passes the status to our mobile SDK

  9. [APP] Our SDK calls one of the two callbacks onPaymentSuccess or onPaymentFailure, depending on the payment result.

    Make sure the activity uses the Interface:

    PaymentManager.PaymentManagerEventListener

    For example your activity could look like this:

    public class MainActivity extends AppCompatActivity implements PaymentManager.PaymentManagerEventListener {

    Add these two functions to get the callbacks from the Payment Manager:

    @Override
    public void onPaymentSuccess(Payment payment) {
        
    }
    @Override
    public void onPaymentFailure(Payment payment) {
        
    }
  10. [APP] Inside onPaymentSuccess, before displaying the result to the user and providing the service you need to do a server verification by calling from the server our payment verification API. Call your server from the App to ask for the verification result. – (Only for Alipay payments)

  11. [SERVER] You need to pass the Nuvei payment ID and the message received from Nuvei mobile SDK. – (Only for Alipay payments)

    POST {{entryPoint}}/{{version}}/payments/{id}/verify
    
    {
       "message": "partner=\"2088101568358171\"&out_trade_no=\"0819145412-6177\"&subject=\"test\"&body=\"testtest\"&total_fee=\"0.01\"&notify_url=\"http://notify.msp.hk/notify.htm\"&service=\"mobile.securitypay.pay\"&payment_type=\"1\"&_input_charset=\"utf-8\"&it_b_pay=\"30m\"&success=\"true\"&sign_type=\"RSA\"&sign=\"hkFZr+zE9499nuqDNLZEF7W75RFFPsly876QuRSeN8WMaUgcdR00IKy5ZyBJ4eldhoJ/2zghqrD4E2G2mNjs3aE+HCLiBXrPDNdLKCZgSOIqmv46TfPTEqopYfhs+o5fZzXxt34fwdrzN4mX6S13cr3UwmEV4L3Ffir/02RBVtU="
    }
  12. [SERVER] Our API checks the transaction and replies back with the status of the verification. – (Only for Alipay payments)

    {
        "status": "Success"
    }
    
  13. [SERVER] If the “status” is Success you can deliver the goods or services. Pass this result to the App. – (Only for Alipay payments)

  14. [APP] Display the payment result to the user.

  15. [SERVER] As a backup for any client communication issues, Nuvei will also send to your server a backend notification as documented here: Payment Notification.
SDK is now fully functional in your app!

Nuvei Android SDK Instructions for Alipay and Wechat (Kotlin)

Now that you have imported the Smart2Pay.SDK package into your app, you need to follow the below steps in order to set up the Mobile SDK for Android in Kotlin language.

If you are using Java go to our section: Nuvei Mobile SDK Configuration using Java language.

First of all you need to start using and install the Kotlin plugin for Android development. For more information, please visit: Getting started with Android and Kotlin.

Configure Kotlin in your project by following the steps below:

  • Click Tools | Kotlin | Configure Kotlin in Project.
  • Select Android.
  • Check if all modules and the selected Kotlin version are correct.
  • Press OK and Kotlin is now part of your Java project.
  1. [APP] Create an order to your server

    //sample code, put your own logic of creating an order to your server
    val orderParameters = HashMap<String, Any>()
            orderParameters["amount"] = "10"
            orderParameters["currency"] = "CNY"
            orderParameters["methodID"] = paymentManager.getMethodId(payment.type).toString()
    
            val paymentsRequest = PaymentsRequest(RequestManager.instance)
            paymentsRequest.setRequestBody(orderParameters)
            paymentsRequest.callback =
                    object : PaymentsRequest.Callback {
                        override fun onSuccess(paymentId: Int, paymentsResponse: String) {
                            payment.id = paymentId
                            payment.instructions = paymentsResponse
                            paymentManager.pay(payment)
                        }
    
                        override fun onFailure() {
    
                        }
                    }
            paymentsRequest.enqueue()
    
  2. [SERVER] Once the order is created on your server, from the server create a Payment using our REST API and specifying isMobileApp: true.

    
    {
      "Payment": {
        "MerchantTransactionID": "{{tester}}-{{env}}-{{time}}-{{rand}}",
        "Amount": "100",
        "Currency": "CNY",
        "ReturnURL": "https://www.merchant.com/return",
        "MethodID" : "24",
        "Customer":{
          "Email": "john.doe@isp.com"
        },
        "Details":{
        "IsMobileApp": true
        }
    
      }
    }
    
  3. [SERVER] Our server responds with Instructions field which you need to pass to the app.

    {
      "Payment": {
        "ID": 4164863,
        "MethodID": 24,
        […]
        },
        "ReferenceDetails": {
    […]
          "Instructions": "_input_charset=\"utf-8\"&appenv=\"system=android^version=3.0.1.2\"&body=\"Alipay Payment\"&currency=\"USD\"&forex_biz=\"FP\"&notify_url=\"https://europaytest.smart2pay.com/Alipay/Landing/AlipayNotificationURL.aspx\"&out_trade_no=\"s2ptest200336\"&partner=\"2088201612260077\"&payment_type=\"1\"&rmb_fee=\"1\"&secondary_merchant_id=\"GP1045\"&secondary_merchant_industry=\"5946\"&secondary_merchant_name=\"demo iasi test\"&seller_id=\"2088201612260077\"&service=\"mobile.securitypay.pay\"&subject=\"Alipay Payment\"&supplier=\"demo iasi test\"&sign=\"vRQ1ouMvn0rJUCxSEi91RLJcS0NU7mojYfJpfT8gxtctF8jfJ4x6uN8t0ETdDdmGziqP7IsYHTSAHdFLHGO4hQdovyzJMna42nc9DcfMMlhTX7ZVCa7rUuieBWcW0ek8w3DxojrWnWT9lM3lUQZVLsY1CjXFGJ126x4TnjrA86w%3d\"&sign_type=\"RSA\""
          },
        "Status": {
          "ID": 1,
          "Info": "Open",
          "Reasons": null
          },
          […]
      }
    }
    
  4. [APP] Pass the instructions from the response to the payment object together with the payment type and Activity.

    override fun onSuccess(paymentId: Int, paymentsResponse: String) {
                            payment.id = paymentId
                            payment.instructions = paymentsResponse
                            payment.activity = this@MainActivity
                            […]
                            }
    
  5. [APP] Call Nuvei Mobile SDK by calling pay() function from the paymentManager object.

    override fun onSuccess(paymentId: Int, paymentsResponse: String) {
                            [...]
                            paymentManager.pay(payment)
                            }
    

    The information needed inside the Payment object of our mobile SDK:

    class Payment {
        enum class PaymentProvider {
            NONE,
            ALIPAY,
            WECHAT
        }
        var id: Int = 0
        var type = PaymentProvider.NONE
        var instructions: String = "" 
        var activity: Activity
    }

    When pasting this into your code the imports should go automatically or you can add them manually:

    import com.smart2pay.sdk.PaymentManager
    import com.smart2pay.sdk.models.Payment
  6. [SDK] Our SDK triggers Alipay or WeChat application

  7. [User] The user completes the payment

  8. [SDK] Alipay or WeChat application passes the status to our mobile SDK

  9. [APP] Our SDK calls one of the two callbacks onPaymentSuccess or onPaymentFailure, depending on the payment result.

    Make sure the activity uses the Interface:

    PaymentManager.PaymentManagerEventListener

    For example your activity could look like this:

    class MainActivity : AppCompatActivity(), PaymentManager.PaymentManagerEventListener {

    Add these two functions to get the callbacks from the Payment Manager:

    override fun onPaymentFailure(payment: Payment) {
    }
    override fun onPaymentSuccess(payment: Payment) {
    }
  10. [APP] Inside onPaymentSuccess, before displaying the result to the user and providing the service you need to do a server verification by calling from the server our payment verification API. Call your server from the App to ask for the verification result. – (Only for Alipay payments)

  11. [SERVER] You need to pass the Nuvei payment ID and the message received from Nuvei mobile SDK. – (Only for Alipay payments)

    POST {{entryPoint}}/{{version}}/payments/{id}/verify
    
    {
       "message": "partner=\"2088101568358171\"&out_trade_no=\"0819145412-6177\"&subject=\"test\"&body=\"testtest\"&total_fee=\"0.01\"&notify_url=\"http://notify.msp.hk/notify.htm\"&service=\"mobile.securitypay.pay\"&payment_type=\"1\"&_input_charset=\"utf-8\"&it_b_pay=\"30m\"&success=\"true\"&sign_type=\"RSA\"&sign=\"hkFZr+zE9499nuqDNLZEF7W75RFFPsly876QuRSeN8WMaUgcdR00IKy5ZyBJ4eldhoJ/2zghqrD4E2G2mNjs3aE+HCLiBXrPDNdLKCZgSOIqmv46TfPTEqopYfhs+o5fZzXxt34fwdrzN4mX6S13cr3UwmEV4L3Ffir/02RBVtU="
    }
    
  12. [SERVER] Our API checks the transaction and replies back with the status of the verification. – (Only for Alipay payments)

    {
        "status": "Success"
    }
    
  13. [SERVER] If the “status” is Success you can deliver the goods or services. Pass this result to the App. – (Only for Alipay payments)

  14. [APP] Display the payment result to the user.

  15. [SERVER] As a backup for any client communication issues, Nuvei will also send to your server a backend notification as documented here: Payment Notification.

SDK is now fully functional in your app!

Nuvei Android SDK Instructions for Credit Cards (Java)

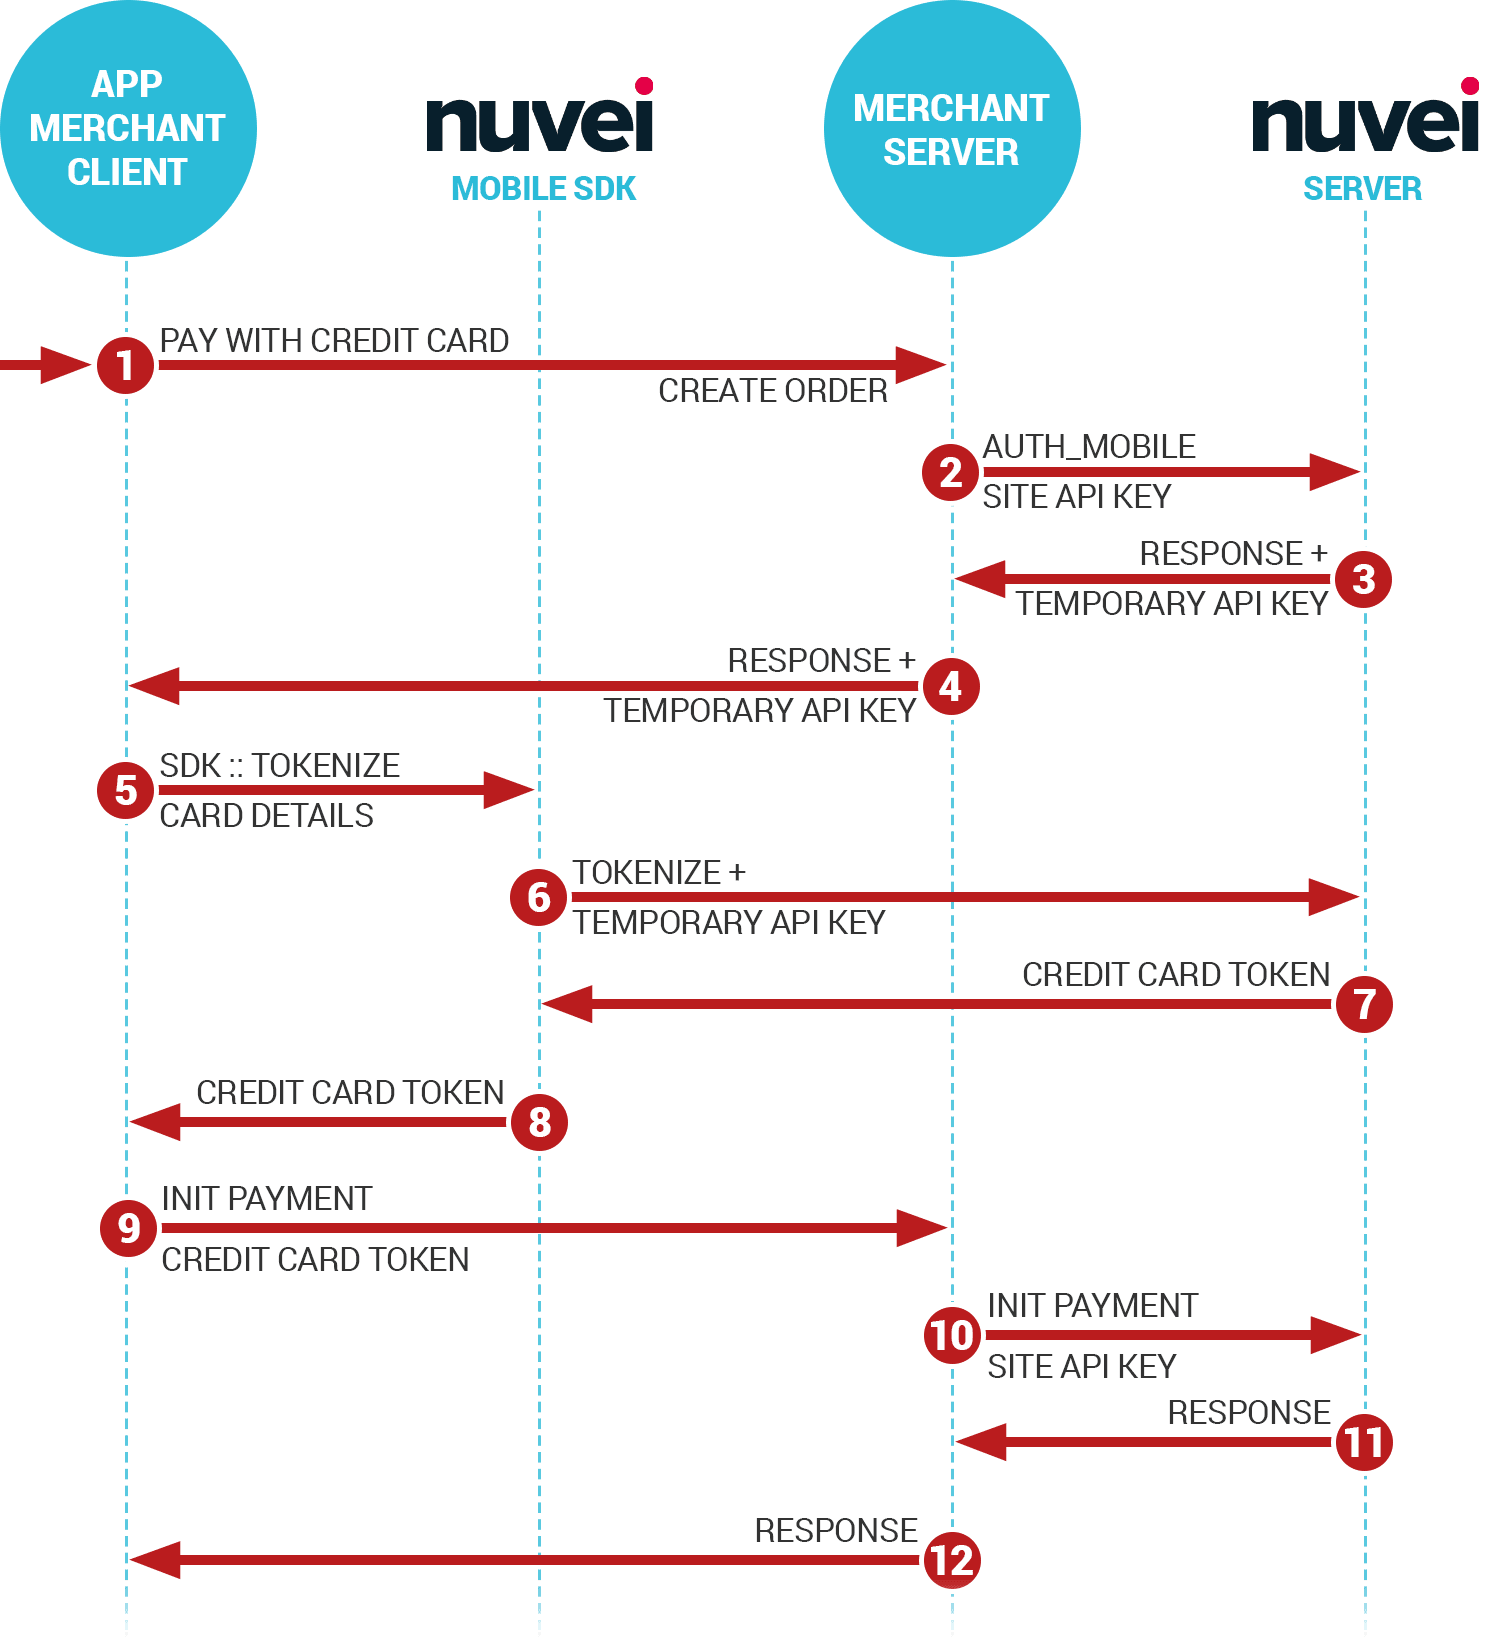
The interaction flow is described next:

  1. Upon order initiation form the customer
  2. Your server asks our server for a temporary API Key at entry point api/authorization/apikey:

    Request:

    POST https://securetest.smart2pay.com/v1/authorization/apikey
    Authorization: Basic MzAyMDE6aEo1Um9iWXg5cjdGZk53Q3ZIWTlMWEhxcXIrRkV6cmM3YUp2UVFrNEdhejFtZzdSeXk=
  3. Our server responds with a temporary API Key:

    Response:

    HTTP/1.1 201 Created
    Content-Type: application/json; charset=utf-8
    
    {
      "ApiKey": {
        "Value": "MzAwMDc6M2FkODVhYzctNjhlNS00MTA2LTliNjctNTg3MmM1ZmI2ZDNiLTYzMzA=",
        "Created": "20181206141407",
        "LifeTime": 30,
        "AccessCounterLimit": 10,
        "Status": {
          "ID": 2,
          "Info": "Success",
          "Reasons": []
        }
      }
    }

  4. The temporary API Key must be passed to the app.
  5. From the app you collect the credit cards details from which you build a CardAuthenticationRequest object, together with the temporary API key obtained in the previous step. Set callback functions to handle Success and Failure cases.
    CardAuthenticationRequest cardAuthenticationRequest = new CardAuthenticationRequest("Basic " + apiKey, true);
    
    HashMap card = new HashMap();
    card.put("HolderName", ((EditText)findViewById(R.id.e_cardholder_name)).getText().toString());
    card.put("Number", ((EditText)findViewById(R.id.e_cc_number)).getText().toString());
    card.put("ExpirationMonth", ((EditText)findViewById(R.id.e_exp_month)).getText().toString());
    card.put("ExpirationYear", ((EditText)findViewById(R.id.e_exp_year)).getText().toString());
    card.put("SecurityCode", ((EditText)findViewById(R.id.e_cvv)).getText().toString());
    
    cardAuthenticationRequest.setRequestBody(CCAuthenticateRequestBodyBuilder.getBody(card));
    cardAuthenticationRequest.setCallback((new CardAuthenticationRequest.Callback() {
        public void onSuccess(@NonNull final String creditCardToken) {
            // Authorization was successful!
            // Send it to your server and initiate a transactions via REST API: https://docs-apm.nuvei.com/category/direct-card-processing/one-click-payment/
            Log.d("TokenForCreditCard", creditCardToken);
            runOnUiThread(new Runnable() {
                @Override
                public void run() {
                    displayDebugInfo("Credit Card Token:" + creditCardToken);
                }
            });
        }
    
        public void onFailure() {
            Log.w(TAG,"Card Authentication request failed.");
            runOnUiThread(new Runnable() {
                @Override
                public void run() {
                    displayDebugInfo("Card Authentication request failed.");
                }
            });
        }
    }));
    cardAuthenticationRequest.enqueue();
    
  6. Our SDK calls our server with these details.
  7. The server responds with a token to our SDK.
  8. Our SDK passed the token back to your APP via the callback function setup in step 5.
  9. The order can now be submitted from the app to your server together with the token
  10. A credit card transaction using token is now initiated from your server. For more details go to: Recurring Card Payments section. You can store the token on your server for subsequent purchases.
  11. Our server responds to your server with the Authorization result. Upon a successful result you can release the goods or services.
  12. You pass the payment result to the app.

SDK is now fully functional in your app!

Nuvei iOS SDK Installation

You need to follow the below steps to build an in-app payment flow fully functional using Nuvei SDK in your iOS app using Swift.

  1. Download the Smart2Pay.framework.
  2. Import the framework into your project by either dragging it into the project or go to File | Add files to “project name”.
  3. Add the framework to the Embedded Binaries. Select the Project icon in your file hierarchy – make sure you are in the General tabEmbedded Binaries.

    There are three scenarios possible do the one that applies to you:

    • If you don’t see it in “Embedded Binaries” and don’t see it in the “Linked Frameworks and Libraries”, just click the + on “Embedded Binaries” and select the Smart2Pay.framework.
    • If you see it in “Linked Frameworks and Libraries” but not in “Embedded Binaries”, you should first remove it from “Linked Frameworks and Libraries” and click the + on “Embedded Binaries” and select the Smart2Pay.framework. This will automatically add it to both.
    • If you see it in both “Embedded Binaries” and “Linked Frameworks and Libraries”, you don’t need to do anything.

Now that the SDK is in the app we can actually use it in the code. Continue with setting up the SDK: Nuvei iOS SDK Instructions (Swift).

Nuvei iOS SDK Instructions (Swift)

Now that you have imported the Smart2Pay.SDK package into your app, you need to follow the below steps in order to set up the Mobile SDK for iOS in Swift language.

  1. To get back to the app after doing a payment we need to set an URL Scheme.

    Select the Project icon again in your file hierarchy – make sure you are in the Info tab – URL Types.

    Fold it open and click the + button. You only need to set URL Schemes field. For example, you can use your bundle identifier. This ensures that there’s no other app that uses this URL Scheme.

    We’re all set to make a payment now!

  2. Create a payment from the data you’ve attained from the API.

    
    ```
    Let payment = Payment(id: id)
    payment.amount = 100 // This is in cents
    payment.currency = "CNY" // Use the three letter abbreviation
    payment.type = .ALIPAY // or .WECHAT 
    payment.delegate = this // The current view controller with PaymentManagerDelegate implementation
    let paymentManager = PaymentManager("urlscheme from step 4")
    paymentManager.pay(payment)
    ```
    
  3. Make sure the view controller uses the delegate implementation:

    PaymentManager.PaymentManagerDelegate

    For example, your view controller could look like this:

    
    `
    class ViewController: UIViewController, PaymentManagerDelegate {
    `
    

    To get the callbacks from the Payment Manager you need to add these two functions:

    
    ```
    func onPaymentSuccess(_ payment: Payment, _ body: [String: Any]) {
    }
        
    func onPaymentFailure(_ payment: Payment) {
    }
    ```
    

    The information needed is inside the payment. This is the structure of a Payment:

    
    ```
    class Payment {
       enum PaymentProvider: Int {
            case NONE = 0
            case ALIPAY = 24
            case WECHAT = 1066
        }
        var id: Int = 0
        var type = PaymentProvider.NONE
        var amount: Int = 0
        var currency: String = ""
        var instructions: String = "" 
        var delegate: PaymentManagerDelegate?
    }
    ```
    

SDK is now fully functional in your app!