Nuvei Prestashop Plugin: connects your Prestashop store to GlobalPay, the latest payment platform of Smart2Pay. Below you will find the necessary details for Prestashop websites administrators on how to install and configure the plugin on your Prestashop store.
Prestashop Plugin Version and Compatibility List
Current stable plugin version of Prestashop is 2.0.7 for Payment Module and 2.0.0 for Detection Module. Nuvei plugin is compatible with Prestashop versions 1.5, 1.6 and 1.7.
Nuvei Prestashop Plugin Installation
After downloading the archive from GitHub, you can install our plugin by following these steps:
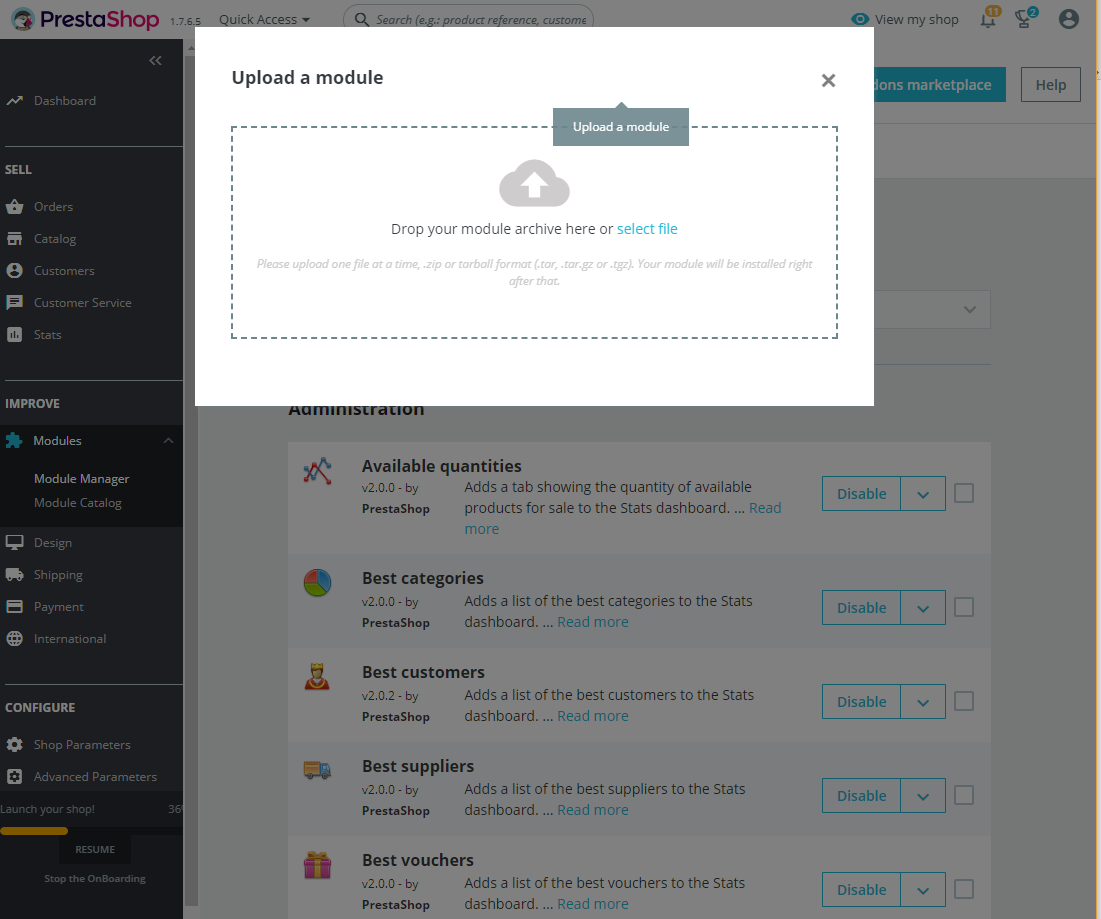
From Prestashop Back Office go to Modules -> Module Manager, press UPLOAD A MODULE button from the top of the page and then select our archived module, as showed in the below picture.
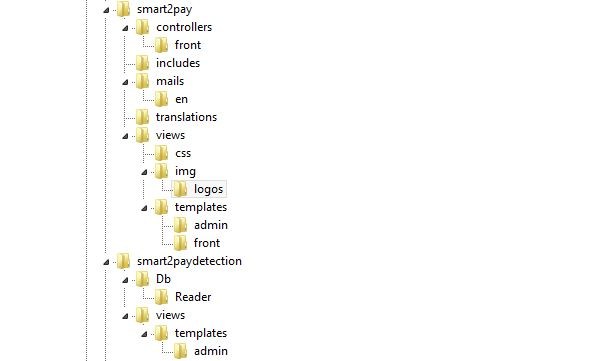
Copy the contents of the archive in your Prestashop Modules folder.
Nuvei Prestashop Plugin Configuration
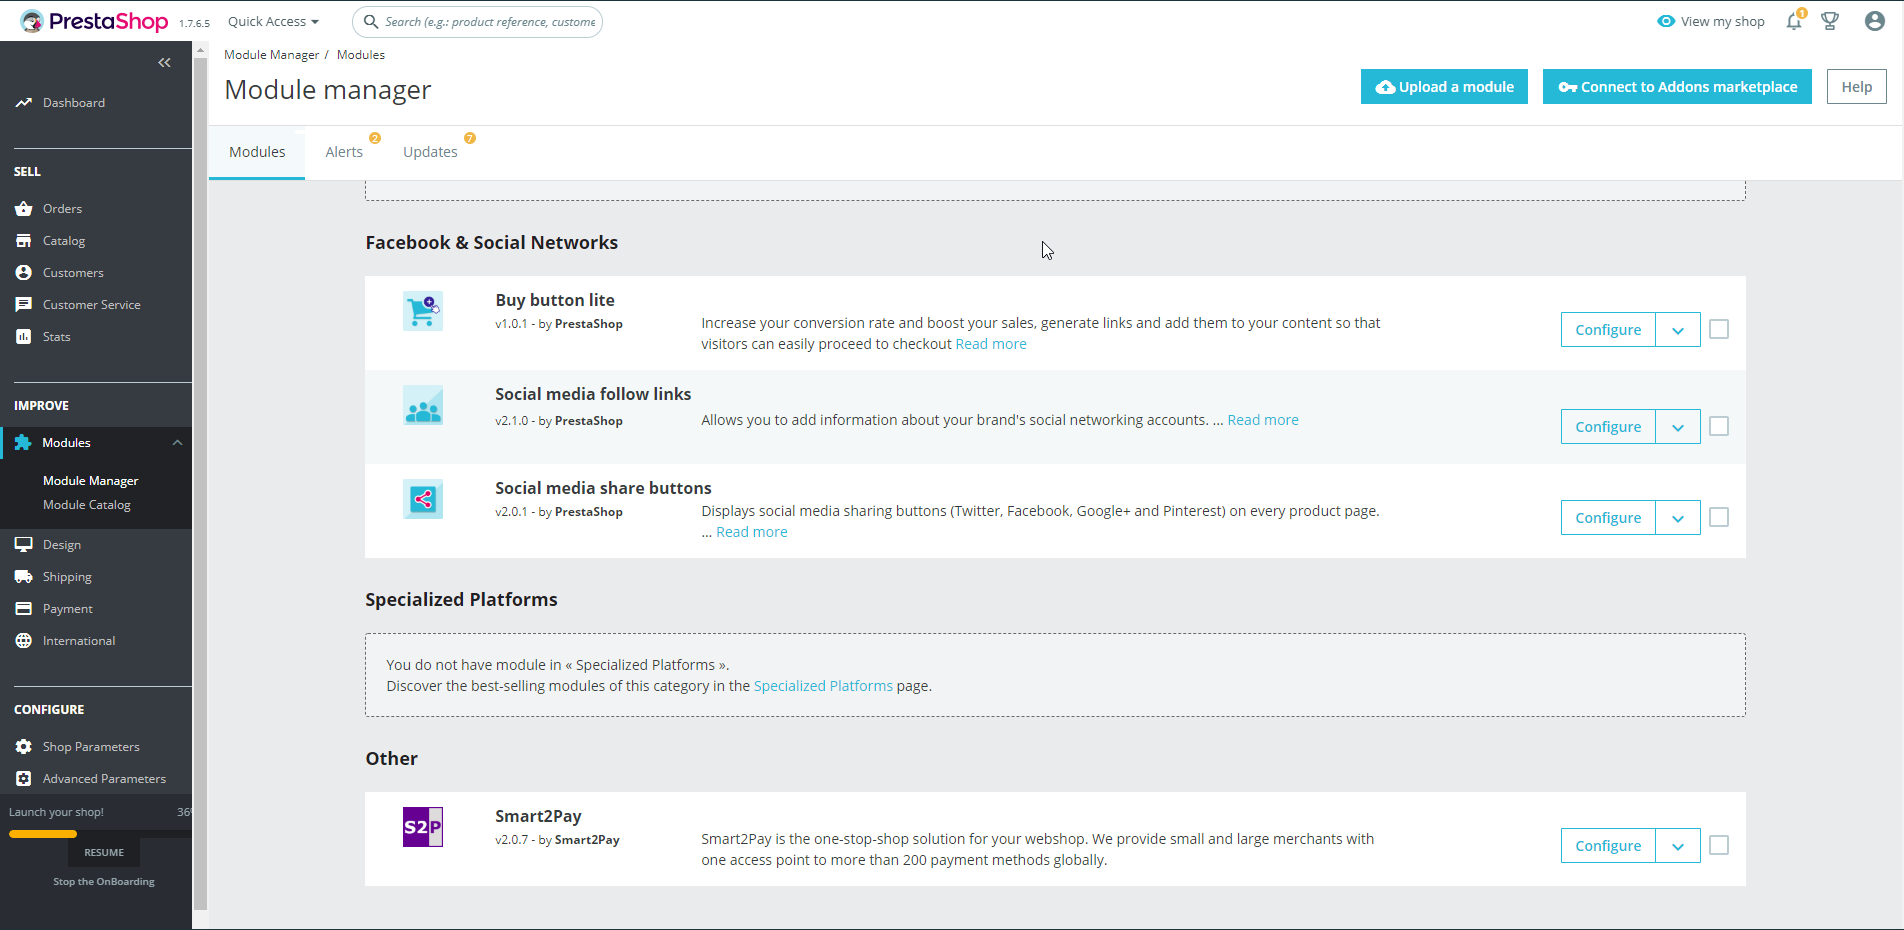
The configurations for the Nuvei Prestashop plugin can be found in the administration area of Prestashop under: Modules -> Modules Manager -> Modules -> Others. A list of all the installed plugins will appear. Select the Nuvei plugin and proceed to configure it by using the Configure button.
Nuvei module contains the generic configurations that are necessary to connect your store with the payment platform. You will also need to activate the payment methods that you intend to use: e.g. Bank Transfer, CashU, SOFORT Banking etc.
Nuvei Payment Module Configuration
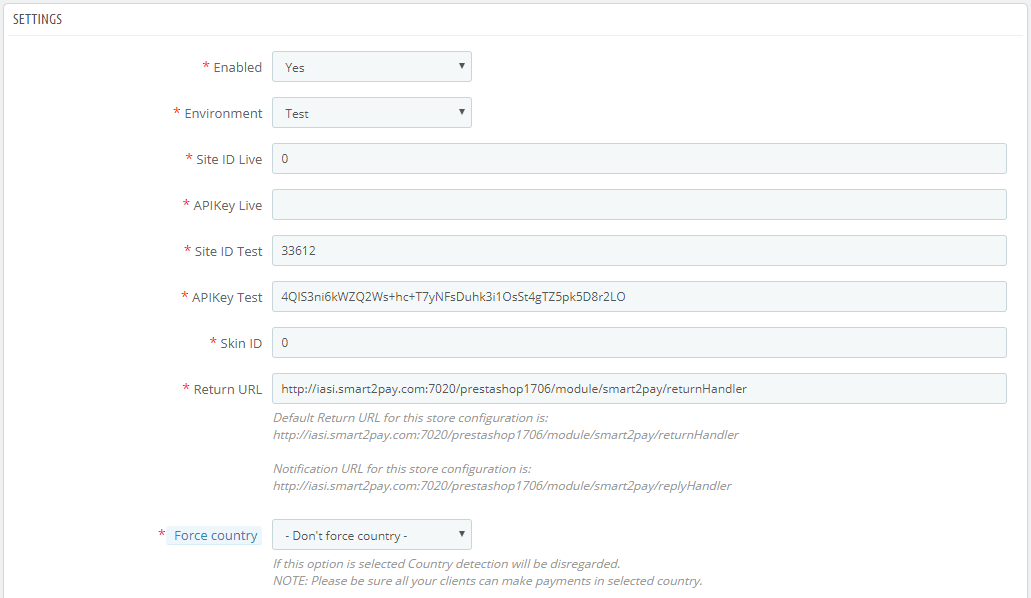
Checkout below the available options of configuration for the Nuvei Prestashop module:
Field
Description
Type
Sample
Enabled
Defines whether the Nuvei payment module is active or not. If it is active it will appear in the payment method lists.
Boolean
Yes
Environment
The environment to which the module points to. If Test is selected, then the Site ID Test and APIKey Test will be used when making the payment. If Demo environment is selected, shop will create transactions on a predefined SiteID and APIKey combination, just so that you can see an end-to-end transaction flow. This will not require any registration on your behalf on our test or live platforms. However, keep in mind that your shop will not receive background notifications about order updates so not all details and functionality for an order will be available / visible.
[Demo, Test, Live]
Demo
Site ID Live
The ID of the Site used for the Live Environment. If you are handling multiple Prestashop websites and you want to use a single MerchantID for all of them, you need to configure multiple websites from GlobalPay Merchant Dashboard, Configuration tab.
Integer
0
APIKey Live
The APIKey for the Live environment. Please make sure the API keys are kept secret and regenerate at once if security has been compromised!
Integer
0
Site ID Test
The ID of the Site used for the Test Environment. If you are handling multiple Prestashop websites and you want to use a single MerchantID for all of them, you need to configure multiple websites from GlobalPay Merchant Dashboard, Configuration tab.
Specify the skin ID. The skins can be created in the Online Skin Editor available in the GlobalPay Merchant Dashboard or by uploading a CSS file.
Integer
0
Return URL
An URL where the customer will be redirected after the payment process ends. It is advisable to include the route smart2pay/feedback action which displays a friendly message to the user depending on the redirection status of the transaction. This field is filled automatically by plugin at install time. If however, this URL doesn’t work for you, you can manually correct it in a similar way which is presented in Sample column.
If this option is selected Country detection will be disregarded.
NOTE: Please make sure that all of your clients can make payments in the selected country.
List
Don’t force country
Field
Description
Type
Sample
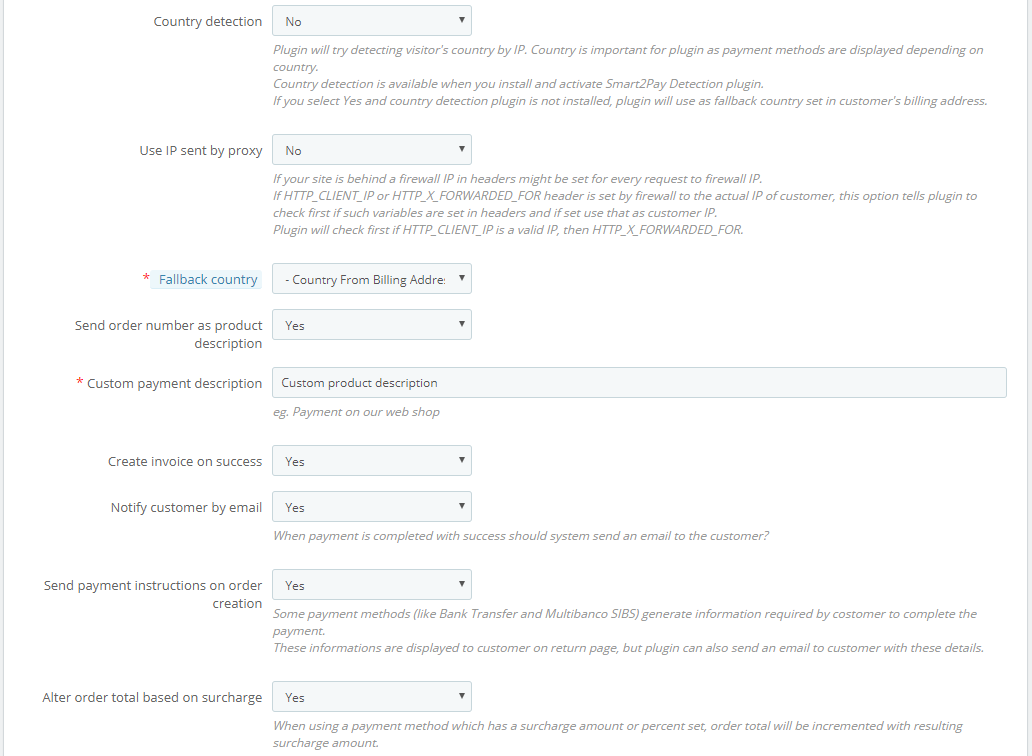
Country detection
The plugin will try detecting visitor’s country by IP. The country is very important as payment methods are displayed depending on the country. Country detection is available when you install and activate Nuvei Detection plugin. If you select ‘Yes’ and the country detection plugin is not installed, the plugin will use the fallback country set in customer’s billing address.
Boolean
Yes
Use IP sent by proxy
If your site is behind a firewall IP in headers might be set for every request to firewall IP.
If HTTP_CLIENT_IP or HTTP_X_FORWARDED_FOR header is set by firewall to the actual IP of customer, this option tells the plugin to first check if such variables are set in headers and if set use that as customer IP. The plugin will first check if HTTP_CLIENT_IP is a valid IP, then HTTP_X_FORWARDED_FOR.
Boolean
No
Fallback country
If the country detection fails or set to ‘No’, the module will use the country set in this field (by default will be: country set in billing address).
List
Country From Billing Address
Send order number as product description
If set to ‘Yes’, the Prestashop order number will be sent as description.
If ‘No’ is selected, the below custom description will be sent.
Boolean
Yes
Custom product description
Specifies a global description that will be sent for all the transactions.
String
Custom product description
Create invoice on success
If set to ‘Yes’, the system automatically creates an invoice if payment is successfully completed. The invoice is automatically set to ‘paid’.
Boolean
Yes
Notify customer by email
If set to ‘Yes’, the system automatically sends a confirmation email to the customer on success payment notification.
Boolean
Yes
Send payment instructions on order creation
Some payment methods (like Bank Transfer and Multibanco SIBS) generate information necessary for customer to complete the payment. This information is displayed to the customer on the return page, but the plugin can also send an email to customer with these details.
Boolean
Yes
Alter order total based on surcharge
When using a payment method which has a surcharge amount or percent set, order total will be incremented with resulting surcharge amount.
Boolean
Yes
Field
Description
Type
Sample
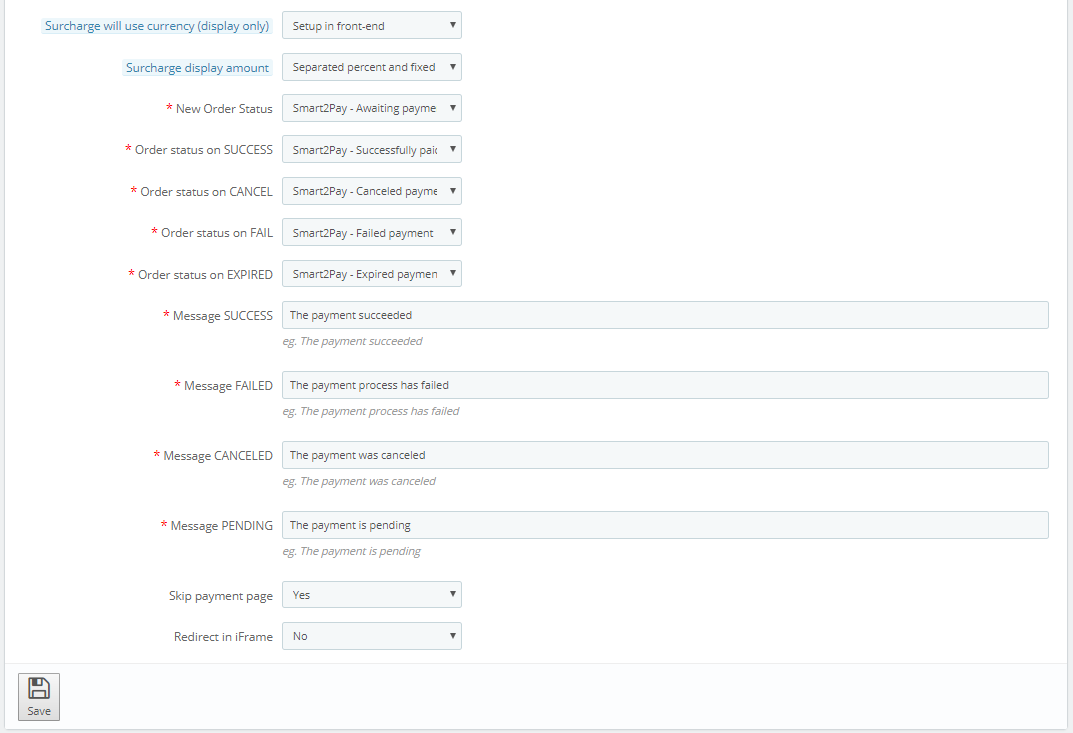
Surcharge will use currency (display only)
When displaying surcharge amount in checkout flow, it will use currency that is: setup in front-end or used in payment method setup
List
Setup in front-end
Surcharge display amount
The display of the surcharge amount in the checkout flow as: separated percent and fixed amount, as sum of percent and fixed amount or as total amount for the order.
List
Separated percent and fixed amount
New Order Status
The status of the order when a new order is created.
List
Nuvei – Awaiting payment
Order status on SUCCESS
You should only deliver the goods/services based on the success notifications. The notifications are received at the notification URL which you set up in the GlobalPay merchant dashboard available at: https://dashboardtest.smart2pay.com. The notification URL is in the form: http://iasi.smart2pay.com:7020/prestashop1706/module/smart2pay/replyHandler. Nuvei Prestashop Plugin automatically updates the order status according to the received notifications. This configuration defines the status of the order when the payment has been successfully completed and a ‘success’ notification is sent by GlobalPay system. You can release the goods/services in this case.
List
Nuvei – Awaiting payment
Order status on CANCEL
The status of the order when a ‘canceled’ notification is received from Smart2Pay’s GlobalPay system.
List
Nuvei – Canceled payment
Order status on FAIL
The status of the order when a ‘failed’ notification is received from Smart2Pay’s GlobalPay system.
List
Nuvei – Failed payment
Order status on EXPIRED
The status of the order when an ‘expired’ notification is received from Smart2Pay’s GlobalPay system.
List
Nuvei – Expired payment
Message Success
The message that is displayed at the end of the payment flow when the redirection status is a success. You should only deliver the goods/services based on the success notification received at the notification URL which you set up in the GlobalPay merchant dashboard available at: https://dashboardtest.smart2pay.com. The notification URL is in the form: http://iasi.smart2pay.com:7020/prestashop1706/module/smart2pay/replyHandler.
String
Thank you, the transaction was processed successfully. After we receive the final confirmation, we will release the goods.
Message Failed
The message that is displayed at the end of the payment flow when the customer is redirected with a failed status.
String
There was a problem processing your payment. Please try again.
Message Canceled
The message that is displayed at the end of the payment flow when the customer has canceled the payment.
String
You canceled the payment.
Message Pending
The message that is displayed to the customer when the redirection status is unknown or the customer must take additional actions to complete the payment: e.g. go to the bank and make an offline bank transfer.
String
Thank you, the transaction is pending. After we receive the final confirmation, we will release the goods.
Skip payment page
If set to ‘Yes’, if all the necessary parameters are sent in the initial POST for a specific payment method, the GlobalPay payment page is skipped and the customer is redirected automatically to the payment method provider.
Boolean
No
Redirect in IFrame
If set to ‘Yes’, GlobalPay will try to keep the payment flow inside the IFrame. Only some payment methods providers support IFrames, for the others the customer will be redirected to the provider in the main window.
Boolean
No
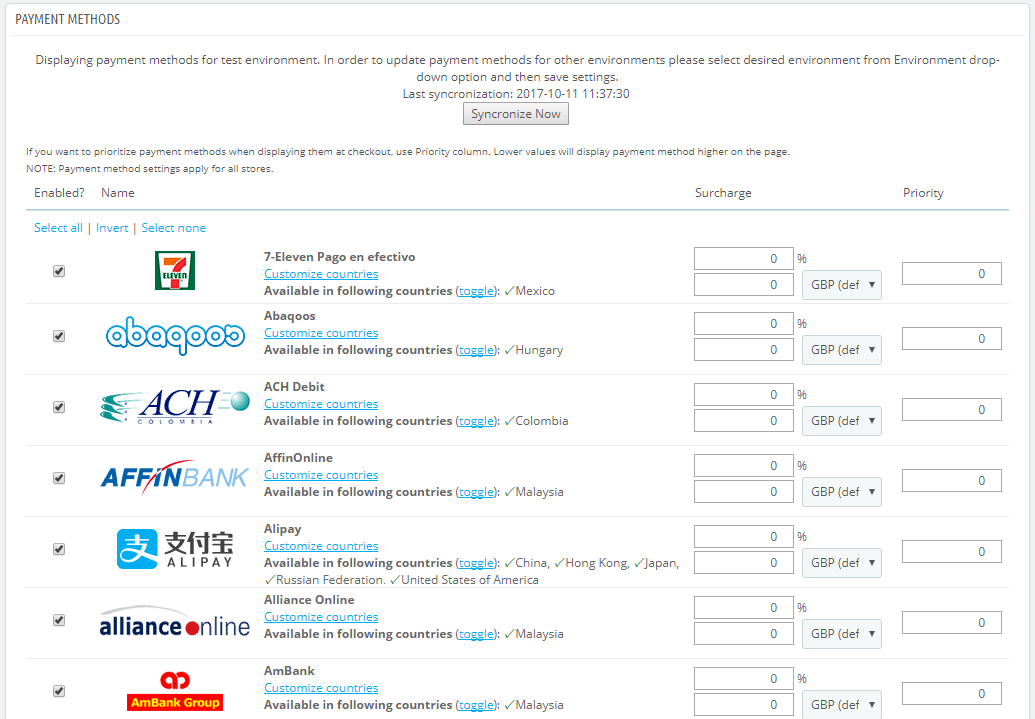
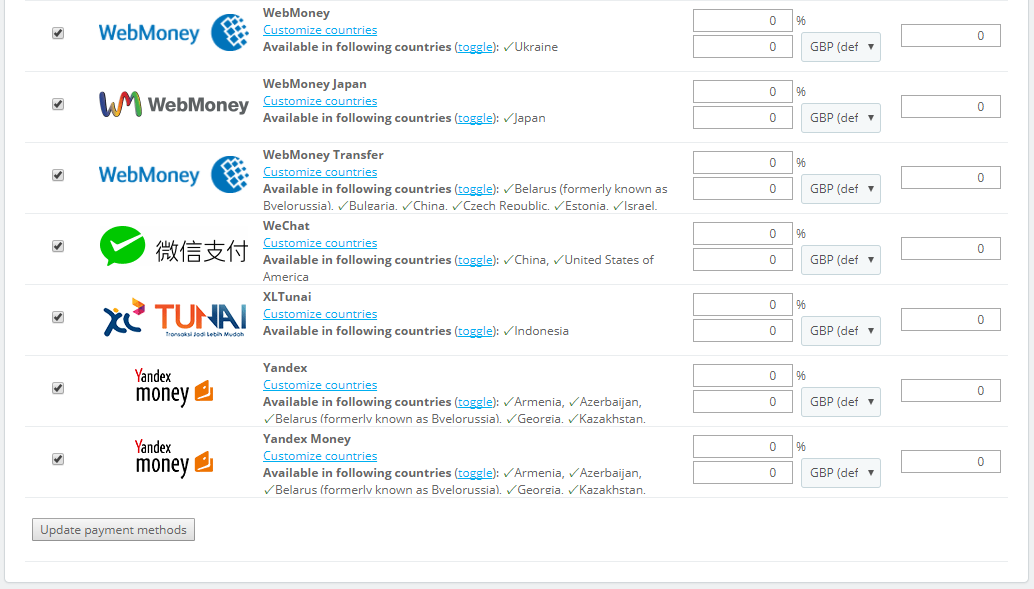
After saving the main configuration of the module, please activate the payment methods that you plan to use.
Surcharge: Some payment methods may have a surcharge, meaning an extra fee added to the regular cost. The surcharge amount is provided in shop’s default currency.
Priority: If you want to prioritize payment methods when displaying them at checkout, use Priority column. Lower values will display payment method higher on the page.
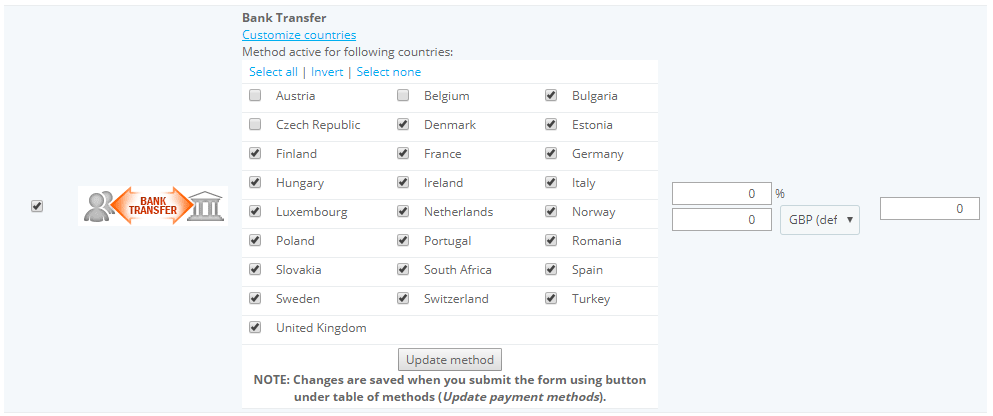
You can select the countries for which the method is active using the Customize countries button.
Press the Update method button so that the updated list of countries to appear. The countries for which the method is active will have a check mark.
Changes are saved when you submit the form using the button Update payment methods which is under the table of methods.
A confirmation message will appear on top of the Configure Nuvei module page.
Nuvei Prestashop Payment Flow
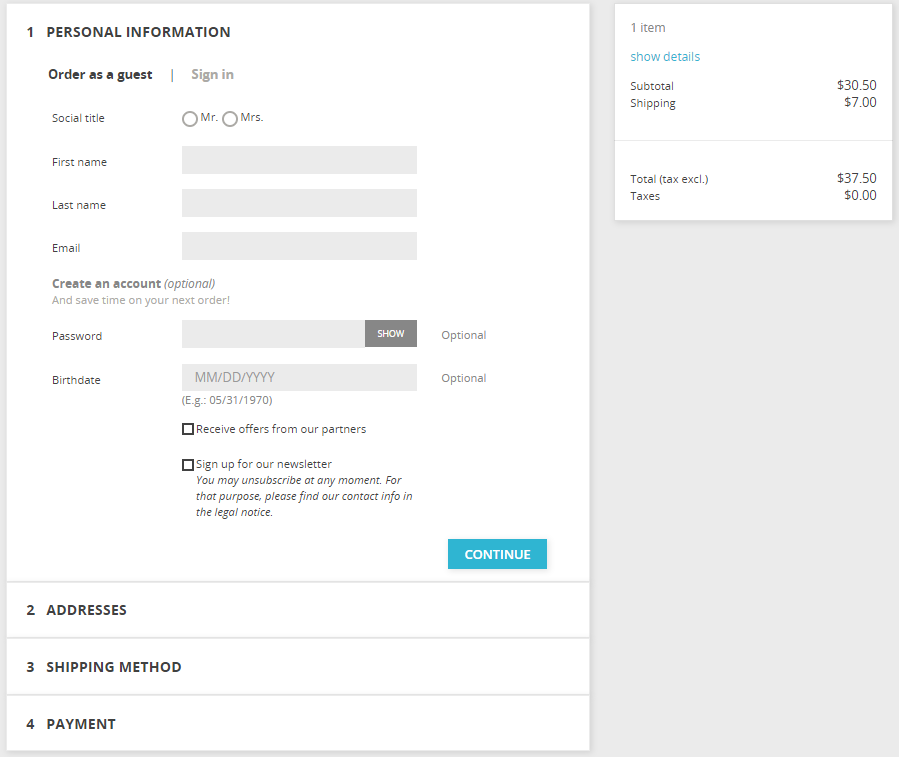
The customer adds the product in the shopping cart and Proceeds to checkout.
The new customer has to enter his personal information, like First Name, Last Name and his Email Address. He also has the possibility to create an account in order to save time on his next order. He will need to provide a password and his birthdate.
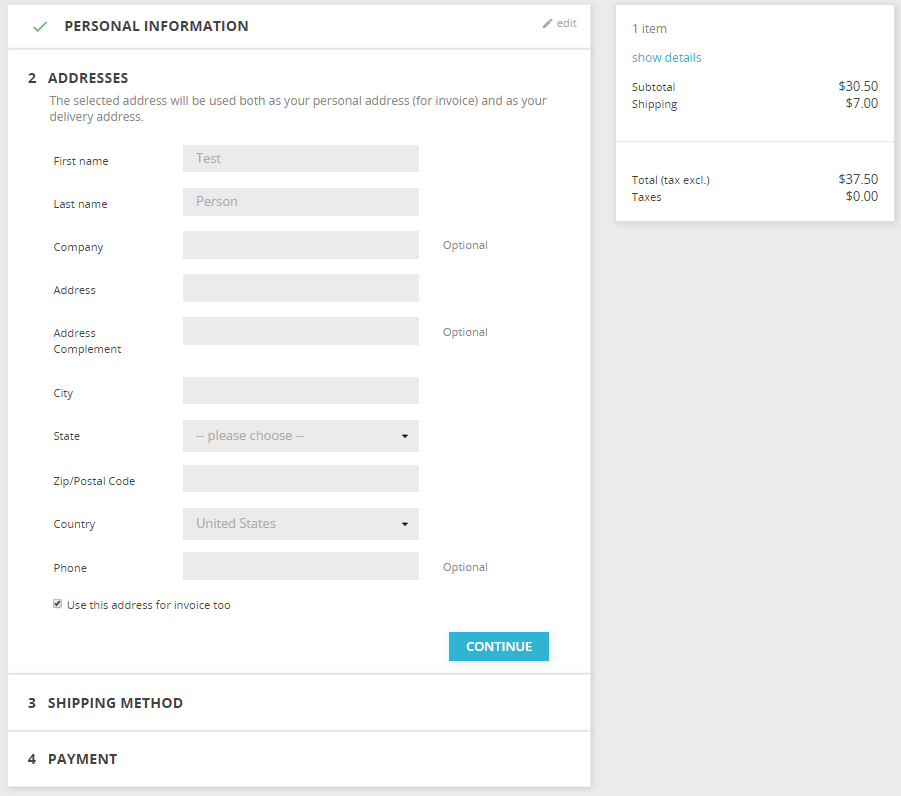
The customer needs to enter the addresses that will be used as his personal address (for invoice) and as his delivery address.
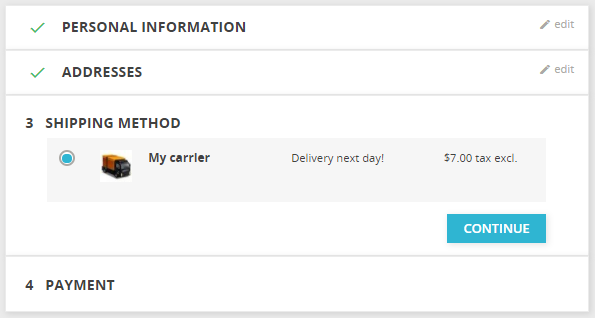
After choosing a delivery address, the customer has to select a shipping method.
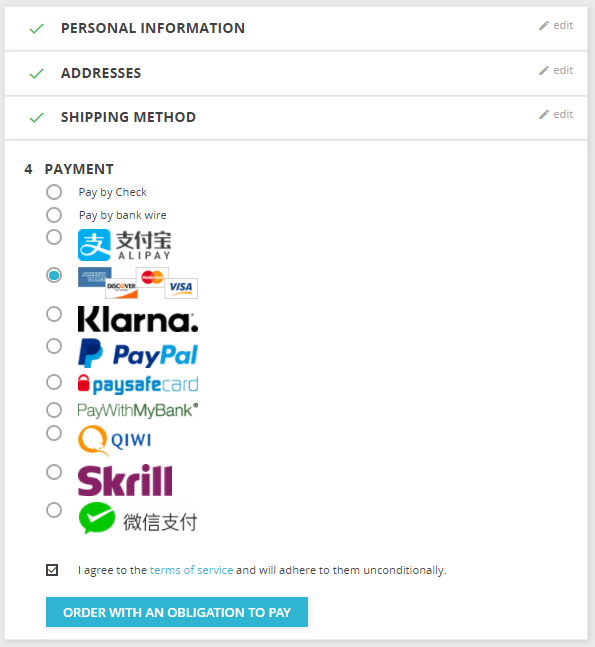
During the checkout process, the customers see the activated payment methods, depending on country detection settings of Nuvei plugin (forced country, country detected by IP or fallback country). The customer needs to select the preferred payment method and he also needs to agree to the term of service.
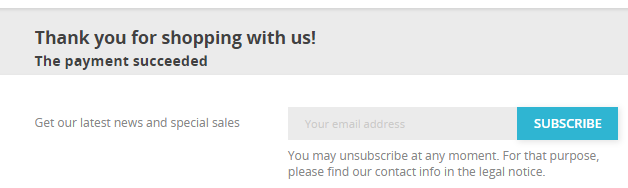
After selecting the preferred payment method from the list, the customer is redirected to the chosen payment method provider where he finalizes the payment.
Upon completion of the payment flow, the customer is redirected back to your website.
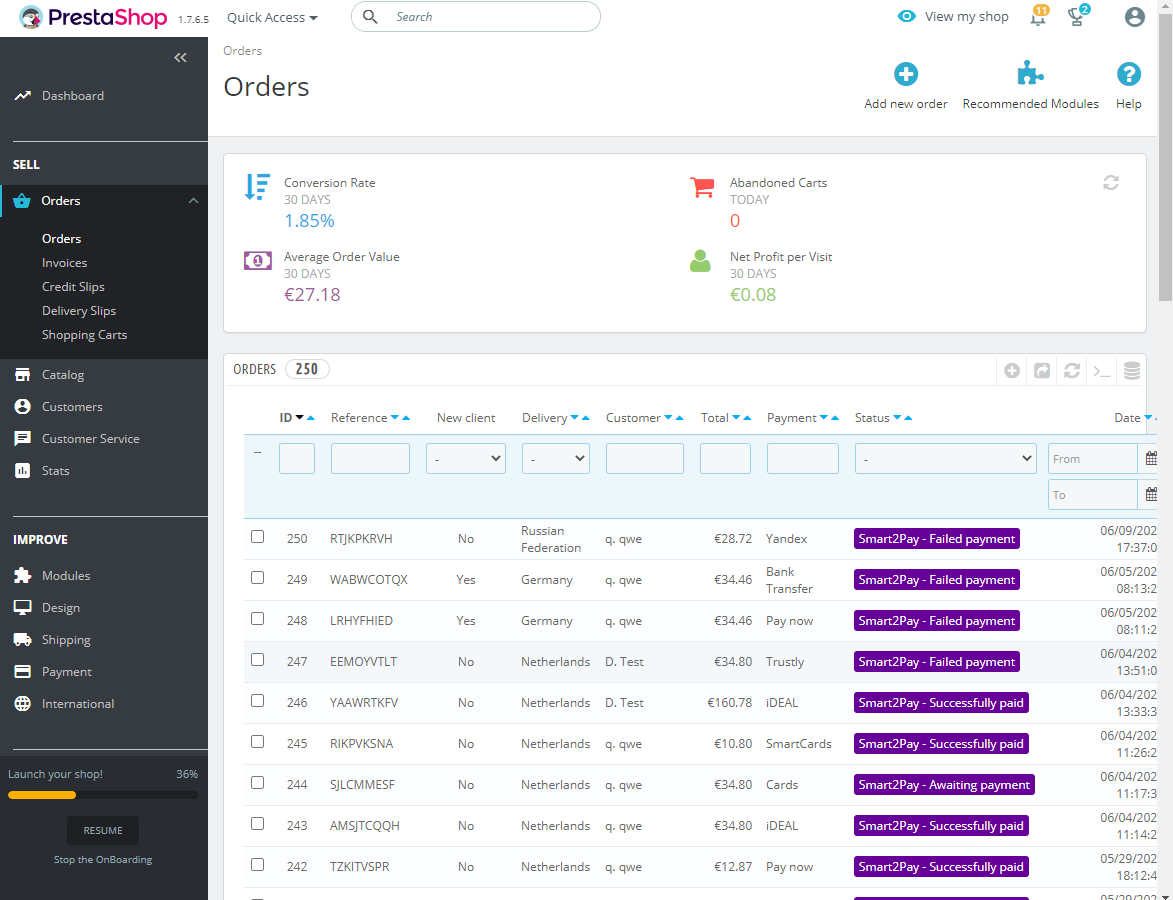
Prestashop Payment Status Notification
After receiving the final confirmation from the provider, our server notifies Prestashop about the status change. The plugin handles these notifications and updates the order accordingly. This can be checked in Prestashop backend in the Sell area -> Orders.