Now that you have imported the Smart2Pay.SDK package into your app, you need to follow the below steps in order to set up the Mobile SDK for Android in Kotlin language.
First of all you need to start using and install the Kotlin plugin for Android development. For more information, please visit: Getting started with Android and Kotlin.
-
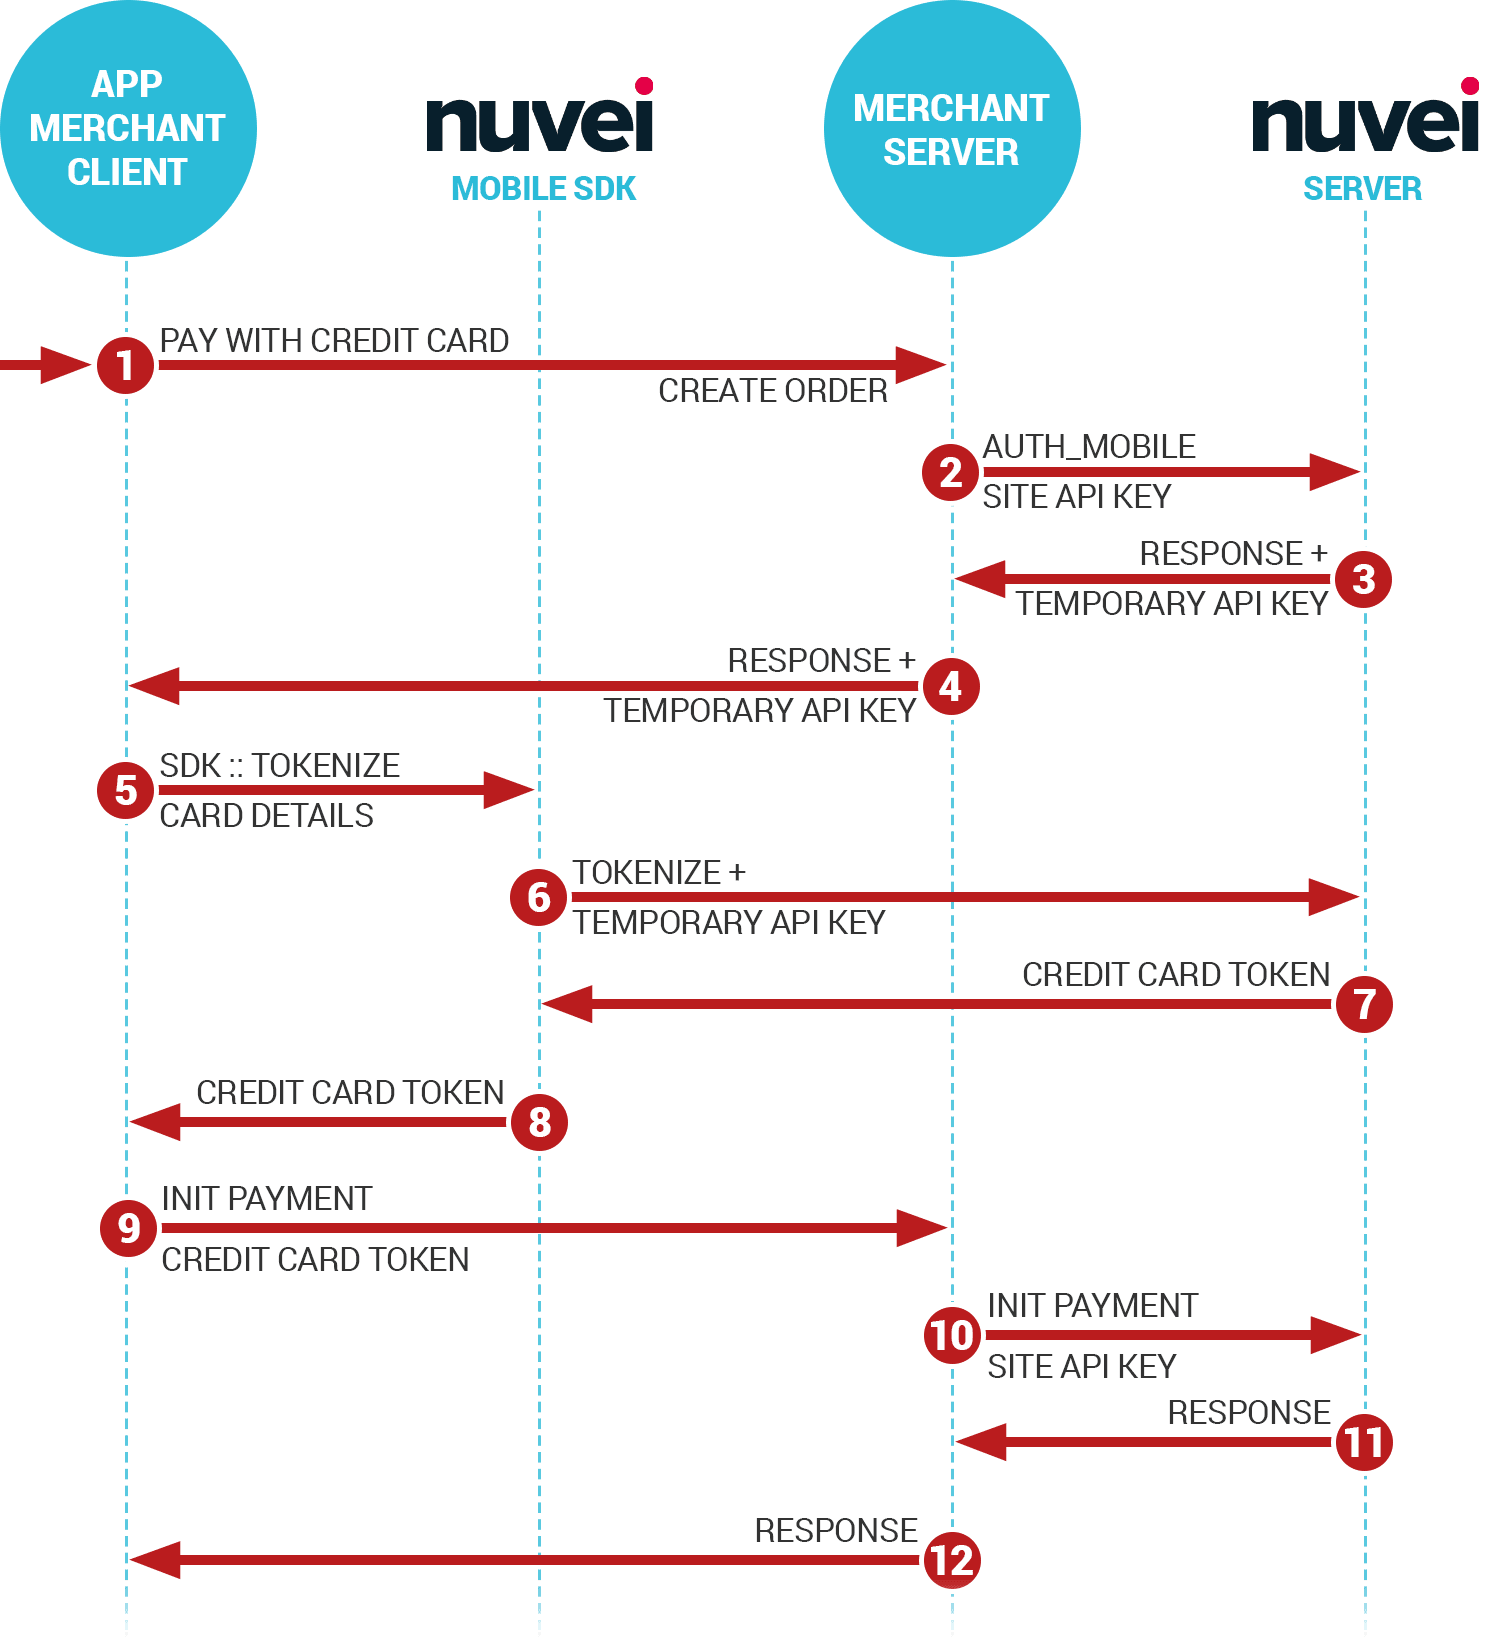
[APP] Create an order to your server
//sample code, put your own logic of creating an order to your server
val orderParameters = HashMap<String, Any>()
        orderParameters["amount"] = "10"
        orderParameters["currency"] = "CNY"
        orderParameters["methodID"] = paymentManager.getMethodId(payment.type).toString()

        val paymentsRequest = PaymentsRequest(RequestManager.instance)
        paymentsRequest.setRequestBody(orderParameters)
        paymentsRequest.callback =
                object : PaymentsRequest.Callback {
                    override fun onSuccess(paymentId: Int, paymentsResponse: String) {
                        payment.id = paymentId
                        payment.instructions = paymentsResponse
                        paymentManager.pay(payment)
                    }

                    override fun onFailure() {

                    }
                }
        paymentsRequest.enqueue()
-
[SERVER] Once the order is created on your server, from the server create a Payment using our REST API and specifying isMobileApp: true.
{
  "Payment": {
    "MerchantTransactionID": "{{tester}}-{{env}}-{{time}}-{{rand}}",
    "Amount": "100",
    "Currency": "CNY",
    "ReturnURL": "https://www.merchant.com/return",
    "MethodID" : "24",
    "Customer":{
      "Email": "john.doe@isp.com"
    },
    "Details":{
    "IsMobileApp": true
    }

  }
}
-
[SERVER] Our server responds with Instructions field which you need to pass to the app.
{
"Payment": {
"ID": 4164863,
"MethodID": 24,
[…]
},
"ReferenceDetails": {
[…]
"Instructions": "_input_charset=\"utf-8\"&appenv=\"system=android^version=3.0.1.2\"&body=\"Alipay Payment\"¤cy=\"USD\"&forex_biz=\"FP\"¬ify_url=\"https://europaytest.smart2pay.com/Alipay/Landing/AlipayNotificationURL.aspx\"&out_trade_no=\"s2ptest200336\"&partner=\"2088201612260077\"&payment_type=\"1\"&rmb_fee=\"1\"&secondary_merchant_id=\"GP1045\"&secondary_merchant_industry=\"5946\"&secondary_merchant_name=\"demo iasi test\"&seller_id=\"2088201612260077\"&service=\"mobile.securitypay.pay\"&subject=\"Alipay Payment\"&supplier=\"demo iasi test\"&sign=\"vRQ1ouMvn0rJUCxSEi91RLJcS0NU7mojYfJpfT8gxtctF8jfJ4x6uN8t0ETdDdmGziqP7IsYHTSAHdFLHGO4hQdovyzJMna42nc9DcfMMlhTX7ZVCa7rUuieBWcW0ek8w3DxojrWnWT9lM3lUQZVLsY1CjXFGJ126x4TnjrA86w%3d\"&sign_type=\"RSA\""
},
"Status": {
"ID": 1,
"Info": "Open",
"Reasons": null
},
[…]
}
}
-
[APP] Pass the instructions from the response to the payment object together with the payment type and Activity.
override fun onSuccess(paymentId: Int, paymentsResponse: String) {
                        payment.id = paymentId
                        payment.instructions = paymentsResponse
                        payment.activity = this@MainActivity
                        […]
                        }
-
[APP] Call Nuvei Mobile SDK by calling pay() function from the paymentManager object.
override fun onSuccess(paymentId: Int, paymentsResponse: String) {
                        [...]
                        paymentManager.pay(payment)
                        }
The information needed inside the Payment object of our mobile SDK:
class Payment {
    enum class PaymentProvider {
        NONE,
        ALIPAY,
        WECHAT
    }
    var id: Int = 0
    var type = PaymentProvider.NONE
    var instructions: String = ""
    var activity: Activity
}
When pasting this into your code the imports should go automatically or you can add them manually:
import com.smart2pay.sdk.PaymentManager
import com.smart2pay.sdk.models.Payment
-
[SDK] Our SDK triggers Alipay or WeChat application
-
[User] The user completes the payment
-
[SDK] Alipay or WeChat application passes the status to our mobile SDK
-
[APP] Our SDK calls one of the two callbacks onPaymentSuccess or onPaymentFailure, depending on the payment result.
Make sure the activity uses the Interface:
PaymentManager.PaymentManagerEventListener
For example your activity could look like this:
class MainActivity : AppCompatActivity(), PaymentManager.PaymentManagerEventListener {
Add these two functions to get the callbacks from the Payment Manager:
override fun onPaymentFailure(payment: Payment) {
}
override fun onPaymentSuccess(payment: Payment) {
}
-
[APP] Inside onPaymentSuccess, before displaying the result to the user and providing the service you need to do a server verification by calling from the server our payment verification API. Call your server from the App to ask for the verification result. – (Only for Alipay payments)
-
[SERVER] You need to pass the Nuvei payment ID and the message received from Nuvei mobile SDK. – (Only for Alipay payments)
POST {{entryPoint}}/{{version}}/payments/{id}/verify
{
"message": "partner=\"2088101568358171\"&out_trade_no=\"0819145412-6177\"&subject=\"test\"&body=\"testtest\"&total_fee=\"0.01\"¬ify_url=\"http://notify.msp.hk/notify.htm\"&service=\"mobile.securitypay.pay\"&payment_type=\"1\"&_input_charset=\"utf-8\"&it_b_pay=\"30m\"&success=\"true\"&sign_type=\"RSA\"&sign=\"hkFZr+zE9499nuqDNLZEF7W75RFFPsly876QuRSeN8WMaUgcdR00IKy5ZyBJ4eldhoJ/2zghqrD4E2G2mNjs3aE+HCLiBXrPDNdLKCZgSOIqmv46TfPTEqopYfhs+o5fZzXxt34fwdrzN4mX6S13cr3UwmEV4L3Ffir/02RBVtU="
}
-
[SERVER] Our API checks the transaction and replies back with the status of the verification. – (Only for Alipay payments)
{
    "status": "Success"
}
-
[SERVER] If the “status” is Success you can deliver the goods or services. Pass this result to the App. – (Only for Alipay payments)
-
[APP] Display the payment result to the user.
-
[SERVER] As a backup for any client communication issues, Nuvei will also send to your server a backend notification as documented here: Payment Notification.